Introduction
Open a damaged shipment and the first question is always whether the packing held up. It usually didn't. According to major carriers, insufficient packaging is the leading reason for claim denial—FedEx explicitly cites it as the most common cause.
Proper packing covers more ground than most people expect. This guide walks through each factor that determines whether your shipment arrives intact:
- Choosing the right box size and strength
- Selecting and applying cushioning correctly
- Sealing and reinforcing the package
- Labeling accurately to avoid delays
Key Takeaways
- Match box size to item size—too big wastes money and causes shifting, too small risks crushing
- Cushion every item with at least 2 inches of material on all sides to absorb impact
- Use pressure-sensitive shipping tape only—masking, duct, and cellophane tape fail under transport stress
- Include a duplicate address label inside the box in case the outer label is damaged
- For fragile or high-value items, professional packing prevents damage and costly claims
What You Need Before Packing Your Package
Having the right materials before you start is the single biggest factor in packing quality. Improvising with the wrong supplies is a leading cause of transit damage.
Boxes and Outer Packaging
Three main outer packaging options serve different purposes:
- Rigid corrugated cardboard boxes - Most common for general items
- Padded envelopes - For soft or flat items under 10 lbs
- Tubes - For posters or rolled documents
Boxes should be sturdy with all flaps intact. The weight limit is printed on the bottom flap via the Box Maker's Certificate (BMC), which lists burst strength (Mullen Test) or stacking strength (Edge Crush Test/ECT).
Reused boxes are acceptable only if they have no weak spots, crushed corners, or damaged seams. Never reuse water-damaged or heavily compressed boxes that have lost structural integrity.
Cushioning and Fill Materials
Choose cushioning based on your item's fragility:
- Bubble wrap - Best for fragile items, corners, and edges; provides multiple layers of protection
- Packing peanuts - Void fill for lightweight non-fragile items; not recommended for flat or narrow products
- Crumpled kraft paper - Lightweight void fill that must be tightly crumpled
- Corrugated inserts - Add structure inside the box for extra protection
ShipMate+ carries a range of packaging supplies at discounted prices, including bubble wrap by the foot or roll, making it easy to stock up without overpaying at general retailers.
Tools for Sealing and Labeling
Gather these before you start:
- 2-inch-wide pressure-sensitive shipping tape (minimum width required by FedEx, UPS, and USPS)
- Permanent marker or printed label for addressing
- Postal or kitchen scale to get accurate weight
- Tape gun (optional) for faster sealing—cuts sealing time roughly in half
How to Pack a Package for Shipping: Step-by-Step
Following each step in sequence ensures the package is structurally sound, properly cushioned, and correctly labeled before it leaves your hands.
Step 1: Verify What You Are Shipping
Check whether the item is prohibited or restricted by your carrier. Hazardous materials, certain batteries, alcohol, and other items have specific rules that affect how—or whether—they can be shipped.
Common restricted items include:
- Lithium batteries (used, damaged, or defective devices must ship via ground only)
- Aerosols and alcohol-based hand sanitizers (flammable, restricted to surface transportation)
- Alcoholic beverages (prohibited for consumers, restricted to approved contract shippers)
Assess the item's fragility, weight, and dimensions. This determines every other packing decision: box size, cushioning type, and whether double-boxing is needed.
Step 2: Select the Right Box
Apply the "just right" principle: the box should be large enough to allow at least 2 inches of cushioning on every side of the item, but not so oversized that the item shifts around freely.
For new boxes, check flap integrity and weight rating. For reused boxes, remove or completely cover all old labels, barcodes, and addresses. Leftover labels confuse automated sorting systems and cause misdirection.
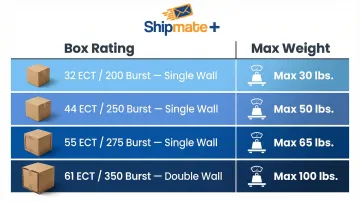
Box strength guidelines (UPS standards):
| Box Rating | Max Weight |
|---|---|
| 32 ECT / 200 Burst (Single Wall) | 30 lbs |
| 44 ECT / 250 Burst (Single Wall) | 50 lbs |
| 55 ECT / 275 Burst (Single Wall) | 65 lbs |
| 61 ECT / 350 Burst (Double Wall) | 100 lbs |
Step 3: Wrap and Cushion the Item
Wrap the item directly before placing it in the box. Use bubble wrap with bubbles facing away from the item surface around all sides. Reinforce corners and edges—these are the most vulnerable impact points during drops.
Fill all empty space inside the box with cushioning material so nothing can shift. Gently shake the sealed box: if you hear or feel movement, add more fill. USPS explicitly recommends this shake test before sealing.
Step 4: Seal the Package
Apply packing tape using the H-tape method: run tape along the center seam and then across both edges of the top and bottom flaps, creating an "H" pattern that distributes stress and prevents the box from popping open.
Seal all seams, not just the top—side seams are a common failure point that shippers overlook. Do not use string, twine, or cord as these catch in carrier sorting equipment.
Pressure-sensitive packing tape is engineered to bond to corrugated cardboard and hold through temperature swings and physical stress. Masking tape dries out and loses adhesion; duct tape does not bond reliably to corrugated surfaces.
Step 5: Label the Package Correctly
Get the labeling right before the box leaves your hands:
- Place the delivery address in the center of the largest face; put the return address in the upper-left corner
- Print clearly with a permanent marker or affix a printed label flat—never fold it over an edge or corner
- Slip a duplicate address label inside the box before sealing; if the outer label tears off or becomes unreadable, carriers can use this to reroute the package
- Expect outer labels to tear off more often than you'd think, especially on packages that get wet or pass through high-volume automated systems
Key Factors That Determine How Well Your Package Survives Transit
Even a well-intentioned pack job can fail if certain variables are overlooked. These four factors have the highest impact on whether a package arrives intact.
Box Strength Relative to Contents
A box rated for 30 lbs packed with a 25-lb item will compress and fail when stacked under heavier packages in a carrier vehicle. Check the weight limit printed on the box bottom flap and compare it against the total packed weight, including all cushioning materials.
Carrier maximum weight limits are 150 lbs for FedEx and UPS, and 70 lbs for USPS.
Cushioning Depth and Coverage
The standard minimum is 2 inches of cushioning between every side of the item and the box wall. UPS requires this minimum; FedEx recommends 2 to 3 inches depending on the item. Less than this leaves the item exposed to impact forces during rough handling.
Uneven cushioning — where one side is well-padded but another has a gap — creates a pressure point where the item hits the box wall. Check all six interior walls before sealing.
Tape Type and Application
Pressure-sensitive packing tape is designed to stick to corrugated cardboard and hold under temperature swings and physical stress during shipping. Using the wrong tape increases the chance of seam failure — and major carriers don't allow masking tape, cellophane tape, or duct tape for sealing.
Acceptable options include:
- Pressure-sensitive plastic tape
- Nylon-reinforced filament tape
- Water-activated paper tape (60-lb grade minimum)
Label Placement and Readability
Automated carrier sorting systems scan labels on a moving conveyor. A label placed on a corner, folded, or partially covered by tape may not scan correctly, delaying or misdirecting the package.
To ensure your label scans every time:
- Place it flat on the largest face of the box, parallel to the longest side
- Only use clear tape at the label edges — don't overlap the printed area
- Never place labels over seams, edges, or closures
- Never wrap a label around a corner
Common Packing Mistakes That Lead to Damaged Shipments
Most in-transit damage is preventable. It traces back to a small set of recurring errors — and knowing what they are makes them easy to avoid.
Using the Wrong Box
Two failure modes exist:
- A box that's too small presses against the item and risks crushing it under stack weight
- A box that's too large lets the item shift and slam into walls during drops and vibration
Also avoid reusing heavily compressed or water-damaged boxes that look intact but have lost structural integrity.
Skimping on Cushioning
Under-cushioning is the most common cause of fragile item claims. One layer of bubble wrap is rarely enough for glass, electronics, or ceramics. The shake test—gently shaking the sealed box—is the simplest quality check before drop-off.
Sealing With the Wrong Tape or Too Little Tape
Masking tape dries out and loses adhesion; duct tape doesn't bond reliably to corrugated surfaces. A single strip down the center seam isn't enough. All flap edges need to be sealed using the H-tape method.
Ignoring the Duplicate Address Label Inside
This often-skipped step is what separates a lost package from a recovered one. Outer labels tear off more frequently than most shippers expect — particularly on packages that get wet or move through high-volume automated sorting.
When to Pack It Yourself vs. Use a Professional Packing Service
Self-packing works well for simple, durable items, but certain shipments introduce real risk of damage or carrier claim denial when packed without expertise.
Professional packing is the smarter choice for:
- Fragile or high-value items (art, electronics, antiques)
- Awkwardly shaped objects that do not fit standard boxes
- Items requiring special materials like anti-static foam for electronics
- Shipments where the sender lacks supplies or experience to pack confidently
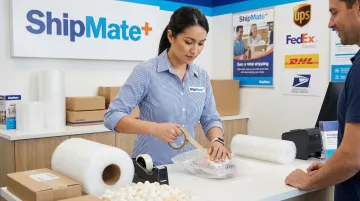
ShipMate+, as an authorized shipper for FedEx, UPS, and USPS, offers professional packing services for exactly these situations. The team handles everything from material selection to sealing, ensuring each package meets carrier standards and qualifies for shipping insurance coverage. For Vista, CA residents who'd rather skip the guesswork, it's a straightforward option — bring the item in, and ShipMate+ takes care of the rest.
Conclusion
Proper packing comes down to a short checklist executed in the right order: right box, right cushioning depth, right tape, and correct labeling. Skip any one of these and the package is at risk regardless of which carrier handles it.
Most transit damage is preventable. The extra few minutes spent packing correctly—or the decision to hand off complex items to a professional packer—pays off every time: items arrive intact, and you never have to deal with a damage claim.
If you'd rather leave the packing to someone else, ShipMate+ in Vista, CA has an experienced team ready to pack, seal, and ship your items through FedEx, UPS, or USPS—all under one roof.
Frequently Asked Questions
What are the 5 biggest packing mistakes to avoid?
The five most common errors:
- Wrong box size (too large or too small for the item)
- Less than 2 inches of cushioning on all sides
- Wrong tape type (masking, duct, or cellophane instead of pressure-sensitive shipping tape)
- Skipping the internal duplicate address label
- Leaving old labels or barcodes on reused boxes
How much cushioning should I use inside a shipping box?
The standard recommendation is at least 2 inches of cushioning material on all sides between the item and the box wall. Pay extra attention to corners and edges, which are the most vulnerable impact points during drops and handling.
Can I reuse old shipping boxes?
Reused boxes are acceptable if structurally sound with no crushed corners or compromised seams. All old labels, barcodes, and markings must be completely removed or blacked out to prevent confusion in automated sorting systems.
What type of tape should I use to seal a shipping package?
Use pressure-sensitive shipping tape at least 2 inches wide. Masking tape, duct tape, and cellophane tape are not recommended by major carriers and often fail during transit from temperature swings and rough handling.
How do I pack fragile items for shipping?
Wrap the item fully in bubble wrap with bubbles facing inward, and reinforce corners and edges with extra wrap. For especially delicate items, use the two-box method — cushioned inner box inside a larger outer box. Fill all void space so nothing shifts in transit.
Should I pack my package myself or use a professional packing service?
Durable, standard items are fine to self-pack. Fragile, high-value, or oddly shaped items benefit from professional packing, which reduces damage risk and simplifies carrier claims if something goes wrong.