Introduction
The shipping label is the single most important piece of a successful shipment—without it, even a perfectly packed box goes nowhere. For individuals and small business owners shipping from home or their workspace, knowing how to print a reliable, scannable label is the difference between on-time delivery and a costly setback.
Printing a label sounds simple—but small mistakes derail shipments fast. The most common culprits include:
- Wrong label size for your printer or carrier
- Poor print settings that produce faded or unreadable barcodes
- Missing required fields (sender address, weight, service type)
- Choosing the wrong carrier for the shipment's size or destination
According to the USPS Office of Inspector General, incorrect address information alone contributes to 6.6 billion undeliverable mailpieces annually, costing the mailing industry approximately $20 billion each year. This guide walks you through everything you need to get it right the first time.
Key Takeaways
- You'll need your shipment details, a carrier account or third-party platform, and a printer to get started
- Standard label size is 4×6 inches; thermal printers are most reliable, but inkjet or laser printers work too
- All major carriers — USPS, UPS, and FedEx — let you generate and pay for labels online for free
- Common mistakes: incorrect addresses, wrong paper size settings, and covering barcodes with tape
- No printer? ShipMate+ in Vista, CA prints and processes labels across all major carriers — no appointment needed
What Goes on a Shipping Label
A shipping label packs far more information than a mailing address. Carriers, sorting facilities, and delivery drivers all rely on it at every step of the delivery process. The industry standard is a 4×6 inch format, designed to fit thermal printers and carrier scanning systems. Deviating from this size causes scan errors because automated sorting equipment expects precise barcode dimensions.
Key fields every shipping label must include:
- Recipient name and full delivery address (including apartment or suite numbers)
- Sender/return address so the package can come back if undeliverable
- Tracking number and scannable barcode — the unique identifier that drives automated sorting
- Package weight, required for postage calculation and handling routing
- Shipping service class (Priority Mail, Ground, Express, etc.)
- Proof of postage payment, such as a permit imprint or meter strip
Shipping label vs. mailing label: A mailing label contains only the address, while a shipping label includes carrier-generated barcodes, tracking numbers, and service information. Handwriting an address alone is not sufficient for most carriers—the barcode is what enables automated processing and tracking throughout the delivery network.
That barcode also varies by carrier. Each uses its own symbology standard:
- USPS: Intelligent Mail Package Barcode (IMpb) and Intelligent Mail matrix barcode (IMmb)
- UPS: Code 128/GS1-128 for tracking barcodes
- FedEx: PDF417 (2D barcode) and FDX1D (1D barcode based on Code 128)
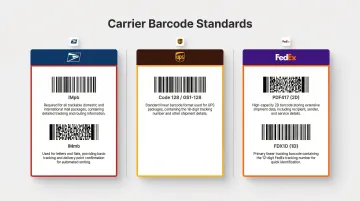
These barcodes are generated only after postage is paid and cannot be altered or handwritten.
What You Need Before Printing a Shipping Label
Getting this right upfront saves you from reprinting labels, surprise surcharges, and carrier delays. Before you start, make sure you have the right equipment, your shipment details on hand, and access to a carrier account or shipping platform.
Equipment and Printer Requirements
Minimum setup needed:
- A computer or mobile device
- An internet connection
- A printer—either inkjet/laser with standard 8.5×11 paper (label must be cut and taped) or a dedicated thermal label printer with 4×6 adhesive label stock
Thermal printers are the recommended choice for frequent shippers. They use heat to print and require no ink or toner, producing more durable, professional labels with high-contrast barcodes ideal for scanning. Popular models include the Rollo (around $170–$200), Dymo LabelWriter 4XL (approximately $240), and Zebra ZD220 (around $350).
Inkjet and laser printers work for occasional shipping, but both come with trade-offs. Inkjet output can smudge — FedEx explicitly cautions against using inkjets for certain label formats. Laser printers are more reliable but slower, and sheet labels cost more than thermal stock.
Shipment Information Required
Before logging into any carrier portal, have these details ready:
- Recipient's full name, street address, city, state, and ZIP code
- Sender's return address
- Accurate package weight - Use a postal or kitchen scale
- Package dimensions (Length × Width × Height) - Required for dimensional weight calculation
- Desired shipping service or delivery speed
All three major carriers use dimensional weight (DIM) pricing — cost is based on whichever is greater: actual weight or volumetric weight. The formula is (L × W × H) ÷ divisor, where USPS uses 166 and UPS/FedEx use 139 for account rates.
Inaccurate dimensions often lead to underpayment, and carriers will bill you the difference after the fact.
Carrier Account or Shipping Platform Access
Most major carriers offer free accounts and free label creation tools online:
- USPS Click-N-Ship - Supports Priority Mail and Priority Mail Express
- UPS.com Create a Shipment - Full access to UPS services
- FedEx Ship Manager - Full access to FedEx services
If you want access to more USPS service classes — including Ground Advantage and First-Class — third-party platforms like Pirate Ship and PayPal Shipping Center are worth considering. Both offer discounted rates with no subscription fees.
How to Print a Shipping Label: Step-by-Step
The process is consistent across carriers: enter details, buy postage, download, configure printer, print, and attach. Follow these steps for reliable results.
Step 1: Enter Your Shipment Details Online
Log in to your carrier's website (USPS Click-N-Ship, UPS.com Create a Shipment, or FedEx Ship Manager) or a third-party platform. Enter the recipient address, return address, package weight, and dimensions. Select the shipping service class that matches your delivery timeline and budget.
Double-check every address field before proceeding. An incorrect ZIP code or missing apartment number is the leading cause of misdelivered packages. Many platforms offer address validation that flags errors before you pay—use this tool to verify both sender and recipient addresses.
Step 2: Purchase Postage and Download the Label
Pay for postage using a credit or debit card through the carrier's secure checkout. Once payment is confirmed, the platform generates a unique label PDF with a tracking barcode. Download it and save a copy in case you need to reprint.
Note that generating a label is free, but it's not valid until postage is purchased — the barcode is only issued after payment. Each tool supports different service classes:
- USPS Click-N-Ship: Priority Mail and Priority Mail Express only
- Third-party platforms: All USPS classes including Ground Advantage and First-Class
- UPS and FedEx: Full service access through their official tools
Step 3: Configure Printer Settings Before Printing
Before printing, confirm these settings in your print dialog:
- Paper size: 4×6 inches (thermal printer) or 8.5×11 (standard printer)
- Scale: Exactly 100% — never "fit to page" or "shrink to fit"
- Headers/footers: Off (especially in browser-based dialogs)
Critical: FedEx explicitly requires scaling set to "none." Distorted barcodes are the top reason labels get rejected at the counter and by automated scanners.
Step 4: Print, Inspect, and Attach the Label
Print a test label on plain paper first to verify alignment and barcode clarity before using adhesive stock. Once printed, inspect the label:
- All text should be legible
- The barcode should be clean and unsmudged
- No information should be cut off
Attach the label to the largest flat face of the package. Press firmly on all edges. Do not fold the label over a box edge, do not cover the barcode with tape (clear tape over the address area only is acceptable), and ensure no part of the barcode is obscured.

Key Factors That Affect Shipping Label Quality
Even a correctly filled-out label can fail at the scanner if the print quality or format is off. These are the variables that matter most.
Label Size and Format
The 4×6 inch format is the industry standard — it fits carrier scanning systems and is the native format for thermal printers. Using non-standard sizes forces rescaling, which distorts barcodes. USPS, UPS, and FedEx all design their systems around this size.
Printer Resolution and Media Type
Thermal printers typically print at 203 DPI or 300 DPI. 203 DPI works reliably for all carriers; 300 DPI produces sharper barcodes, particularly for smaller QR codes. For inkjet or laser printers, standard copy paper can smear in humidity — adhesive label paper holds up better in wet or rough transit conditions.
Ink Coverage and Darkness Settings
For thermal printers, darkness settings directly affect scan reliability. Too low produces faded barcodes; too high causes bleeding that obscures fine barcode lines. Start at the midpoint of your printer's range and adjust from there. FedEx requires a minimum 90% print contrast for direct thermal labels.
Barcode Specifications
Carriers mandate strict quality parameters for barcode placement and dimensions:
- Quiet zones: Minimum 0.1 inches above/below and 0.2 inches left/right (FedEx)
- Barcode height: Minimum 0.65 inches for linear barcodes (UPS, USPS)
- X-dimension: Width of the narrowest bar, typically 13–15 mils
Meeting these specs ensures scanners can read barcodes reliably at every sorting facility.
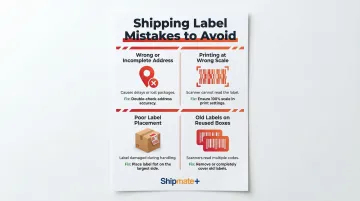
Common Mistakes When Printing Shipping Labels
Most shipping label problems come down to four avoidable errors. Catching them before the package leaves your hands saves time, money, and frustration.
- Wrong or incomplete address: A missing suite number, misspelled street name, or incorrect ZIP code can delay or misdeliver a package. Use the carrier's address verification tool and cross-check against the original order before printing.
- Printing at the wrong scale: Selecting "fit to page" compresses the barcode and causes scan failures at carrier facilities. Always print at 100% scale, and confirm your paper size matches the physical label stock in the printer.
- Poor label placement: Taping over barcodes (even with clear tape) creates glare that confuses scanners. Folding a label around a box corner splits the barcode across two surfaces. Place the label flat on the widest surface, at least 1 inch from any edge.
- Leaving old labels on reused boxes: Any previous barcodes on a reused box must be fully removed or blacked out. Carriers will reject packages with multiple visible tracking barcodes.
What to Do If You Don't Have a Printer
No printer? No problem. You have several solid options for getting a label printed and a package on its way.
Use Carrier QR Code Services
USPS, UPS, and FedEx all support QR-code-based label printing. You purchase postage online, receive a QR code, and present it at a carrier location where the label is printed at the counter.
Here's how each carrier handles it:
- USPS Label Broker: Pay through Click-N-Ship and select "Print later at Post Office." You'll get an email with a QR code and an 8-10 character code. Bring your sealed package to any participating Post Office — scan the code at the retail counter or self-service kiosk to print the label free.
- UPS: Create a shipment in the UPS app, get a mobile barcode, and take it to a UPS Store for free label printing.
- FedEx: Same process through the FedEx app — generate a mobile barcode and present it at any FedEx Office location.
Print at a Library, Office Supply Store, or Print Shop
Most public libraries and office supply chains (such as Staples or Office Depot) offer computer and printing access. Access your label PDF on their systems and print to standard paper, then tape it securely to the package. Label quality may vary, and thermal printing is typically not available at these locations.
Drop Off at an Authorized Ship Center Like ShipMate+
For those in the Vista, CA area, ShipMate+ handles the entire process as an authorized FedEx, UPS, and USPS shipper. Bring your package and shipment details, and the team prints the label, ensures correct formatting, and processes the shipment—no printer, no carrier accounts, no hassle.
ShipMate+ offers multi-carrier options under one roof, discounted packaging supplies, and package signing and notification services. The store is located at 1929 W Vista Way Suite F, Vista, CA 92083, and is open Monday-Friday 9:00 AM - 6:00 PM and Saturday 9:00 AM - 1:00 PM. Contact them at (760) 295-1074 or info@shipmateplus.com.
When DIY Printing Makes Sense vs. Using a Service
DIY label printing works best when:
- Shipping volume is consistent (several packages per week)
- A thermal printer is already available
- You're comfortable managing carrier portals
A full-service drop-off location is the better call for:
- One-off shipments
- Complex packages requiring professional packing
- Fragile or high-value items
- Anyone who wants to avoid troubleshooting printer and portal issues entirely
High-volume shippers will find a thermal printer pays off quickly — lower per-label costs, no ink expenses. Occasional shippers, though, usually get more value from just dropping the package off at a ship center than dealing with printer setup and troubleshooting.
Frequently Asked Questions
Is it cheaper to print your own labels or buy them?
Printing your own labels at home saves the retail counter fee but requires upfront investment in a printer and label stock. For occasional shippers, the convenience of a ship center may offset the small service fee. For high-volume shippers, home printing with a thermal printer is typically more cost-effective over time.
Is it worth buying a label printer?
A dedicated thermal label printer pays off if you ship more than a few packages per week, since it eliminates ink costs, prints faster, and produces more durable labels than inkjet or laser. Entry-level models start around $60, with popular brands like Rollo ranging from $170–$200. For occasional shippers, a standard printer with adhesive label paper is sufficient.
Where can I print labels if I don't have a printer?
You can print labels at carrier locations (USPS, UPS, FedEx via QR code), libraries, office supply stores like Staples or Office Depot, or authorized ship centers like ShipMate+ in Vista, CA where staff handle printing and processing on your behalf.
What size should a shipping label be?
The industry standard is 4×6 inches for thermal printing. When printing on standard 8.5×11 paper, the label occupies a portion of the sheet and must be cut and taped to the package, ensuring the barcode is not folded or covered.
Can I print a shipping label on regular paper?
Yes, regular 8.5×11 paper works with inkjet or laser printers. The printed label must be trimmed and securely taped to the package with clear tape, taking care not to cover the barcode. Adhesive half-sheet label paper is a cleaner alternative that eliminates the need for tape.
Do I need to pay for a shipping label before printing it?
Yes, postage must be purchased before a valid, scannable label is generated. Creating a shipment online is free, but the barcode is only issued after payment — unpaid labels are rejected at carrier facilities. If you'd rather skip the process entirely, ShipMate+ staff in Vista, CA handle payment and printing for you at the counter.